Personalized Medical Care & Dedicated International Patient Concierge

Medical Guide
Front Tooth Implants in Seoul: Gumline & Crown Design
Explore how front tooth implant planning in Seoul coordinates index-guided surgery, gumline contour, custom titanium abutments, and zirconia crowns.
Schedule a ConsultationFront Tooth Implants in Seoul: Gumline, Custom Abutment and Crown Design Explained
Medically reviewed by Dr. Hanna Lee, DDS, MSD, PhD
Replacing a missing or failing tooth in the front of the mouth is one of the most technically demanding procedures in restorative dentistry. Unlike a molar hidden in the back of the jaw—where chewing strength is the primary concern—an anterior restoration sits in full view every time you speak, laugh, or smile. Achieving natural anterior dental implant aesthetics requires far more than anchoring a titanium post into bone. If the fixture is angled even slightly too far forward, or if the connecting components fail to support the delicate scallop of the surrounding soft tissue, the final tooth can look overly long, flat, or shadowed along the margin.
For international patients researching a front tooth implant Seoul workflow, understanding how surgical placement and prosthetic design interact is essential. At Harue Dental Clinic in Gangnam-gu, Seoul, front tooth replacement is planned backward from the intended final smile: the implant trajectory, front tooth implant gumline design, custom titanium abutment, and zirconia front tooth crown are engineered as a single coordinated system rather than separate stages. Below is a clinical guide to how esthetic-zone implantology works, what shapes the soft-tissue emergence profile, and how the front tooth implant timeline is structured from initial 3D imaging to final seating.
The Bottom Line
- Esthetic-zone implants are planned from the crown down: In visible front teeth, the ideal three-dimensional position of the titanium fixture is dictated by the future crown's incisal edge, emergence profile, and gumline symmetry—not simply where bone happens to be thickest.
- Gumline architecture depends on both bone and subgingival contour: Preserving the thin facial bone plate and interdental bone peaks next to neighboring teeth maintains the small triangular gum tissues (papillae) and helps prevent dark spaces or gum recession.
- Every anterior site benefits from a custom titanium abutment: Standard cylindrical stock abutments do not match the triangular cross-section of a natural incisor root; a CAD/CAM custom titanium abutment transitions smoothly from the circular implant platform to support the patient's natural gingival scallop.
- In-house digital zirconia fabrication refines shade and translucency: Combining a custom titanium abutment with an in-house milled zirconia crown avoids the dark gray margin associated with older metal-fused crowns while reproducing subtle incisal light transmission.
- Predictable timelines require biological integration: While surgical placement of a single anterior fixture takes about 60 to 90 minutes under local anesthesia, completing a front tooth implant Korea treatment typically spans two to three primary visits across a three to six month window so bone and soft tissue can mature stably.
Why the Anterior Esthetic Zone Is Clinically Unique
In dental implantology, the upper and lower front teeth visible during a full smile are known as the esthetic zone. When a patient seeks a missing front tooth replacement, clinical success is evaluated by two complementary standards: white esthetics (the shape, proportion, surface texture, shade, and translucency of the ceramic crown) and pink esthetics (the color, contour, zenith height, and interdental papilla fill of the surrounding gum tissue).
Several anatomical factors make the anterior maxilla far less forgiving than the back of the mouth:
- The Thin Labial Bone Plate: The outer wall of bone covering the front of an upper incisor root is naturally very thin, often measuring less than one millimeter. When a front tooth is lost to trauma, root fracture, or gum disease, this fragile outer wall resorbs rapidly. Without careful three-dimensional planning, loss of labial bone causes the overlying gum tissue to flatten or recede upward, making the replacement crown look longer than the natural tooth beside it.
- The Root-to-Implant Geometry Mismatch: A natural upper central incisor root has a rounded-triangular or ovoid cross-section at the gumline, whereas a dental implant fixture is circular and narrower in diameter. Bridging the transition from a round implant platform below the bone to a lifelike tooth contour at the gum surface requires precise subgingival sculpting known as the emergence profile.
- Interdental Papilla Support: The small pyramids of pink gum tissue that fill the spaces between front teeth—the mesial and distal papillae—are supported by the bone crest attached to the adjacent natural teeth. If an implant is placed too close to a neighboring root, or if the contact point of the new crown sits too far from the bone crest, the papilla can shrink back and leave a visible "black triangle."
- Smile Line Visibility: In patients who show their upper gumline when smiling, even a small discrepancy in the gingival zenith (the highest point of the gum arch over a tooth) or a gray shadow beneath thin mucosa is immediately visible.
Because of these anatomical constraints, treating an anterior implant as a routine hardware procedure often leads to esthetic compromises. At Harue Dental Clinic, Dr. Hanna Lee—who has 30+ years of clinical experience and has placed 90,696 cumulative implants as of September 2025—approaches front tooth restoration by integrating surgical implantology with facial-proportion-based prosthodontic design from the start.
Prosthetically Driven Planning and Index-Guided Placement
Historically, implants were placed wherever the jawbone offered the greatest volume, leaving the restorative dentist to angle a crown onto the fixture months later. In the front of the mouth, separating surgery from prosthetics is a leading cause of bulky crowns and labial gum recession.
Designing the Crown Before Placing the Fixture
Modern esthetic-zone protocols invert that sequence through prosthetically driven planning. During the diagnostic evaluation, the implant site and neighboring teeth are captured using 3D imaging and optical scanning. Before surgery begins, the clinician plans the intended crown shape, gumline contour, and shade in relation to the adjacent teeth and facial midline.
Only after the virtual crown is defined is the titanium implant fixture positioned across three spatial axes:
| Spatial Axis | Clinical Objective in the Anterior Zone | Consequence of Improper Positioning |
|---|---|---|
| Mesiodistal (Side-to-Side) | Maintain safe clearance from adjacent natural tooth roots to preserve interproximal bone blood supply. | Placing the fixture too close to a neighboring root causes crestal bone loss and flattens the interdental papilla. |
| Labiopalatal (Front-to-Back) | Position the implant axis slightly palatal to the incisal edge so adequate facial bone and soft tissue remain in front. | Placing the implant too far forward thins the outer bone wall and increases the risk of facial gum recession. |
| Apicocoronal (Depth) | Set the implant platform at an exact depth below the planned mid-facial gum margin for a gradual emergence profile. | Too shallow leaves insufficient vertical room for the abutment transition; too deep complicates hygiene and tissue stability. |
How Index-Guided Placement Works at Harue Dental Clinic
To transfer this digital plan into the mouth accurately, Harue Dental Clinic pairs 3D imaging with an index-guided implant placement technique and the Ankylos implant system (for which Dr. Hanna Lee serves as an Asian advisor and Harue was named a clinical research partner clinic in 2008).
Rather than estimating drill angulation freehand, index-guided placement positions the fixture directly in relation to the planned final crown. When 3D imaging confirms that native bone volume and density are sufficient, this minimally invasive approach seats the implant cleanly within the existing bony architecture.
Front Tooth Implant Gumline Design: Sculpting the Emergence Profile
A natural central incisor emerges from the gums with a gentle, asymmetrical arch whose highest point sits slightly toward the outer side of the tooth center, framed by healthy interdental papillae. Achieving a realistic front tooth implant gumline design requires shaping the transmucosal zone—the vertical corridor of soft tissue between the bone crest and the visible gum edge:
- The Critical Contour: The shallow ring of the abutment and crown immediately beneath the free gingival margin (roughly the top one to one-and-a-half millimeters). Its width dictates where the gum margin sits and how the crown appears to emerge from the tissue.
- The Subcritical Contour: The deeper zone between the critical contour and the implant platform. A concave or straight profile here gives peri-implant connective tissue room to thicken without compressing the underlying bone.
Clinical research shows that an overly convex (bulging) facial emergence profile pushes against thin labial mucosa and increases the frequency of gum recession over the first 12 months. By contrast, a concave subcritical contour paired with an anatomical critical contour supports stable soft-tissue volume.
Custom Titanium Abutment vs. Stock Abutment
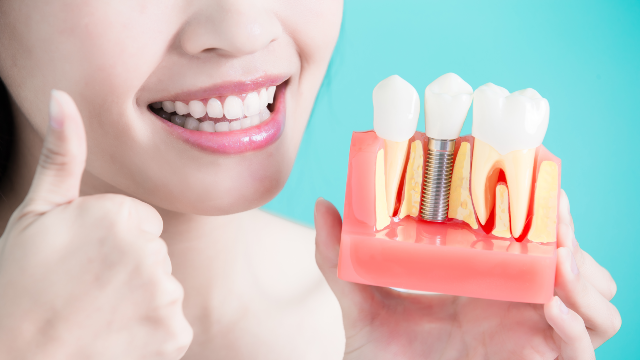
An implant restoration has three parts: the titanium fixture inside the bone, the visible ceramic crown, and the abutment that passes through the gum tissue to connect them. Using a prefabricated "stock" abutment in the front of the mouth creates predictable compromises:
- Shape Mismatch: Stock abutments are uniform circular cylinders. Because a front tooth root is triangular or ovoid at the gumline, placing a crown onto a narrow round cylinder forces the ceramic to flare abruptly at the margin.
- Uneven Margin Depth: The gumline around a front tooth scallops higher between the teeth and curves lower on the front and back faces. A flat stock abutment shoulder cannot follow this wave, leaving the cement line either too deep between the teeth—making excess cement removal difficult—or too shallow on the front face.
Why Harue Designs a Custom Titanium Abutment for Every Case
In Harue Dental Clinic's anterior protocol, a custom titanium abutment is digitally designed for every front tooth implant case rather than using a stock abutment.
| Feature | Prefabricated Stock Abutment | CAD/CAM Custom Titanium Abutment |
|---|---|---|
| Cross-Sectional Geometry | Uniformly circular; does not match anterior tooth anatomy. | Patient-specific triangular or ovoid emergence profile tailored to the site. |
| Finish Line (Margin) Scallop | Flat or preset collar height around the circumference. | Follows the natural wave of the patient's mesial, facial, distal, and palatal gumline. |
| Cement Removal & Hygiene | Deep interproximal margins complicate thorough cement cleanup. | Margins sit just beneath the gum edge for reliable inspection and daily hygiene. |
| Biomechanical Support | Generic post geometry often requires uneven ceramic bulk. | Precision titanium connection paired with tailored wall support for the zirconia crown. |
Milled in Harue's in-house digital laboratory, the custom titanium abutment cradles the surrounding gum architecture while providing strong mechanical resistance against the oblique shearing forces generated when lower incisors glide against upper front teeth.
Zirconia Front Tooth Crown Design: Proportions, Shade, and Translucency
Once the implant integrates and the custom titanium abutment shapes the emergence profile, the final visual element is the zirconia front tooth crown. Older porcelain-fused-to-metal (PFM) crowns layered ceramic over a dark metal core, which blocked natural light transmission and often exposed a dark gray line if the gum receded.
Harue Dental Clinic restores anterior implants with metal-free zirconia implant crowns digitally designed and milled in-house using 3D camera imaging, digital CAD/CAM software, and CEREC equipment (introduced at Harue in 2007). To match a single replacement crown to its natural neighbor across the midline, Dr. Hanna Lee—who holds Patent No. 10-1067942 for a facial-proportion-based implant treatment method and a 2011 tooth-design patent—evaluates four optical details chairside:
- Proportions and Line Angles: Sculpting the vertical light-reflecting ridges (transitional line angles) on the front surface so the optical width matches the neighboring incisor.
- Graduated Shade Mapping: Transitioning smoothly from a warmer, more saturated tone near the gumline to a natural body shade in the middle third.
- Incisal Translucency: Replicating the subtle light transmission and internal enamel depth along the biting edge without an opaque metal core.
- Bite Comfort and Anterior Guidance: Refining how the crown contacts opposing teeth during biting and jaw movements before final placement. Patients can view completed examples in the clinic's before and after gallery.
Candidacy and Clinical Exclusions
Candidacy for a front tooth implant Seoul procedure is confirmed through an in-person clinical evaluation and 3D imaging of bone density, gum health, and adjacent roots.
Who Is a Candidate—and Who Is Not Suitable
- Best Candidates: Adults who have lost or have a failing front tooth due to trauma, fracture, a non-restorable root, or localized gum disease; patients replacing an unsatisfactory prior front implant, bridge, or crown; and patients who want to replace a missing front tooth independently without grinding down healthy neighboring teeth.
- Clinical Exclusions: Harue Dental Clinic identifies individuals with severe uncontrolled diabetes, active periodontal disease, heavy tobacco reliance, untreated bone loss, or young patients whose jaw growth is incomplete as unsuitable for immediate front tooth implant placement. In many adults, stabilizing gum disease, managing systemic health, or performing bone augmentation first allows staged treatment to proceed safely.
Step-by-Step Front Tooth Implant Timeline in Seoul
For patients traveling from the United States—such as Los Angeles, New York, San Francisco, Houston, or Chicago—a front tooth implant Korea treatment plan generally requires two to three primary visits across a three to six month window, with surgical placement taking about 60 to 90 minutes. (While selected cases with ideal bone density and site condition may support a shortened restorative timeline, this is assessed individually rather than promised universally.)
| Stage | Typical Timing | Clinical Steps Performed | Travel & Recovery Notes |
|---|---|---|---|
| Visit 1: 3D Assessment & Placement | Initial Trip (Surgery: 60–90 minutes; fly home 2–3 days post-op) | 3D imaging of bone and adjacent teeth; pre-surgical planning of crown shape, gumline, and shade; index-guided placement of the Ankylos titanium implant under local anesthesia. | Local anesthesia blocks pain during placement. Most patients can fly home 2 to 3 days after surgery once a post-op check confirms stable healing and no bleeding. |
| Integration Window | 3 to 6 months overall treatment window | Biological osseointegration of the titanium fixture with the jawbone and soft-tissue maturation. | Patients protect the healing site from excessive biting force while at home. |
| Visit 2 (and 3 if staged): Custom Abutment & Crown | Return Trip after integration | 3D camera imaging; in-house digital fabrication of the custom titanium abutment and zirconia crown; chairside refinement of shade, translucency, and bite before final seating. | In-house CAD/CAM milling avoids waiting weeks for an external dental laboratory. |
| Follow-Up Review | Before departure & remote care | Verification of gum health, bite function, and aesthetic fit, with remote English support afterward. | Overseas follow-up support is available via +82 2 543 0037 and info@haruedentalclinic.com. |
Founded in 1995 and located at 41-11, Gangnam-daero 162-gil, Gangnam-gu, Seoul (Sinsa-dong, Harue Dental Clinic Building), Harue Dental Clinic is a Ministry of Health and Welfare–registered medical institution for foreign patients and maintains a 19-step infection-control system. All surgical and prosthetic stages are performed by one lead dentist, Dr. Hanna Lee, who completed her DDS, MSD, and PhD degrees in implantology at the Catholic University of Korea Graduate School of Dentistry (where she serves as an Adjunct Professor) after graduating second in her class from Pusan National University College of Dentistry in 1994, and completed a clinical implant surgery program at the University of Berlin. Patients can browse the clinic reviews page or schedule an inquiry through Harue Dental Clinic's contact page with English-speaking coordinator Jeon Jin-mi (confirm interpreter availability for specific appointments in advance).
Risks and Long-Term Care
Potential clinical risks include infection, delayed healing, implant failure requiring revision, crown chipping, cementation failure, or gradual gum changes around the crown margin over time. No permanent or guaranteed outcome is promised, as longevity depends on baseline bone quality, gum health, bite habits such as clenching, daily brushing and flossing, and regular six-month dental checkups.
Frequently Asked Questions
How long does front tooth implant surgery take, and is it painful?
Surgical placement of a single front tooth implant typically takes 60 to 90 minutes. Standard local anesthesia completely blocks sensation in the surgical site during placement. Mild soreness or swelling over the following days is normal and manageable with prescribed medication.
How many visits to Seoul are needed for a front tooth implant?
Treatment typically requires two to three primary visits across a three to six month window: an initial visit for 3D planning and index-guided implant placement, followed by a return visit after bone integration for in-house fabrication and fitting of the custom titanium abutment and zirconia crown. Selected cases with ideal bone density may qualify for a shortened timeline after individual evaluation.
When can I fly home after front tooth implant placement?
Most patients can safely fly home 2 to 3 days after single implant placement once initial swelling stabilizes and Dr. Hanna Lee completes a postoperative check confirming no bleeding or complications. Cases involving bone grafting may require a longer stay.
Why is a custom titanium abutment used instead of a stock abutment?
A stock abutment is a generic round cylinder that does not match the triangular contour of a front tooth root. A CAD/CAM custom titanium abutment is designed for your specific implant site to shape a natural emergence profile, support the interdental papillae, and follow your gumline scallop.
Will a zirconia front tooth implant crown show a dark gray gumline?
Unlike older porcelain-fused-to-metal (PFM) crowns that have an opaque metal substructure inside the crown margin, a zirconia crown is 100% metal-free ceramic. Paired with a custom titanium abutment positioned beneath the tissue margin, it transmits light naturally and avoids a dark metal collar.
What should I do if I have a concern after returning home to the U.S.?
Contact Harue Dental Clinic's international coordinator team at +82 2 543 0037, info@haruedentalclinic.com, or via the clinic website to describe your symptoms. For severe pain, persistent bleeding, pronounced swelling, or fever, seek urgent in-person care from a local dentist or physician immediately.
This article is for informational purposes only and is not a self-diagnosis tool or a substitute for a clinical examination and personalized treatment plan from a licensed dentist.
More Articles
Continue reading our clinical guides.